By: Phil Woubshet
This exercise will demonstrate how to copy multiple tables from an on-premise SQL Server database to Azure SQL Data Warehouse. We will use a metadata table that contains the schema/table names to drive the copy process from source to sink.
There are numerous reasons to utilize cloud computing to supplement or replace a traditional on-premise system. Our current use cases are:
- Copying numerous tables between environments (Prod to Test, Prod to Sandbox, Test to Dev, etc.)
- Migrating from an on-premise environment to the cloud to take advantage of flexible resources
- Sharing data with different groups that do not have access to an on-premise resource
Prerequisites
- On-premise SQL Server
- Optional: Azure blob storage account that will be used for staging data during the copy in order to utilize Polybase
- Self-hosted Integration Runtime within Data Factory (instructions to create it if you don’t already have one)
- Azure Synapse Analytics (instructions to create it if you don’t already have one)
Create and Populate On-Premise SQL Server Metadata Table
Create a metadata table in your on-premise database that will drive the copy operation. For the purposes of this demo, we are using the tables [Person].[Address] and [Person].[AddressType] that came from an [AdventureWorks] database.
|
1 2 3 4 5 6 7 8 9 10 |
DROP TABLE IF EXISTS DataFactoryMeta CREATE TABLE DataFactoryMeta ( TableSchema VARCHAR(255) ,TableName VARCHAR(255) ,Active BIT ) INSERT INTO DataFactoryMeta VALUES ('[Person]','[Address]',1) ,('[Person]','[AddressType]',1) |
Data Factory Configuration
Create a Data Factory
- Launch Microsoft Edge or Google Chrome web browser. Currently, Data Factory UI is supported only in Microsoft Edge and Google Chrome web browsers.
- Go to the Azure portal.
- From the Azure portal menu, select Create a resource.
- Select Integration, and then select Data Factory.
- On the New data factory page, enter a name for your data factory.
- For Subscription, select your Azure subscription in which you want to create the data factory.
- For Resource Group, use one of the following steps:
- For Version, select V2.
- For Location, select the location for the data factory.
- Select Create.
- After the creation is complete, you see the Data Factory page. Select the Author & Monitor tile to start the Azure Data Factory user interface (UI) application on a separate tab.
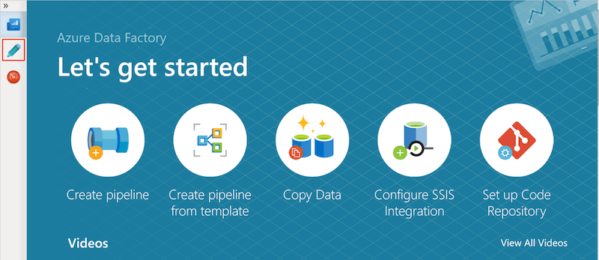
- On the Let’s get started page, switch to the Author tab in the left panel.
- Select Manage, and then select the New button on the toolbar.
- On the New linked service page, select SQL Server, and then select Continue.
- Fill out the required fields and be sure to choose your self-hosted integration runtime under Connect via integration runtime. Test Connection and select Create.
- Select Manage, and then select the New button on the toolbar.
- On the New linked service page, select Azure Synapse Analytics, and then select Continue.
- Fill out the required fields, Test Connection and select Create.
- Select the + (plus) button, and then select Dataset.
- On the New dataset page, select SQL Server, and then select Continue.
- Under Linked Service, choose the on-prem linked service previously created, select the metadata table under Table name, and then select OK.
- Select the + (plus) button, and then select Dataset.
- On the New Dataset page, select Azure Synapse Analytics, and then select Continue.
- Under Linked Service, choose the Azure Synapse Analytics linked service previously created, select the metadata table under Table name, and then select OK.
- Switch to the Parameters tab, click + New, and enter DWTableName for the parameter name.
- Switch to the Connection tab.
- In the left pane, click + (plus), and click Pipeline.
- In the General tab, specify IterateAndCopySQLTables for name.
- Switch to the Parameters tab, and do the following actions:
- In the Activities toolbox, expand Iteration & Conditions, and drag-drop the ForEach activity to the pipeline design surface. You can also search for activities in the Activities toolbox.
- In the Activities toolbox, expand Move & Transfer, and drag-drop Copy Data activity into the pipeline designer surface. Notice the breadcrumb menu at the top. The IterateAndCopySQLTable is the pipeline name and IterateSQLTables is the ForEach activity name. The designer is in the activity scope. To switch back to the pipeline editor from the ForEach editor, you can click the link in the breadcrumb menu.
- Look up the on-prem SQL Server Database metadata table to get the list of tables to be copied.
- Trigger the pipeline IterateAndCopySQLTables to do the actual data copy.
- In the left pane, click + (plus), and click Pipeline.
- In the General tab, change the name of the pipeline to GetTableListAndTriggerCopyData.
- In the Activities toolbox, expand General, and drag-drop Lookup activity to the pipeline designer surface, and do the following steps:
- Switch to the Settings tab, and do the following steps:
- Drag-drop Execute Pipeline activity from the Activities toolbox to the pipeline designer surface, and set the name to TriggerCopy.
- Switch to the Settings tab, and do the following steps:
- To validate the pipeline, click Validate on the toolbar. Confirm that there are no validation errors. To close the Pipeline Validation Report, click >>.
- To publish entities (datasets, pipelines, etc.) to the Data Factory service, click Publish All on top of the window. Wait until the publishing succeeds.
- Select GetTableListAndTriggerCopyData from the available Pipelines.
- Select Add Trigger, then select Trigger Now and select Finish.
- To monitor progress, select the red Monitor icon on the leftmost pane.


The name of the Azure data factory must be globally unique. If you see the following error, change the name of the data factory (for example,

a. Select Use existing, and select an existing resource group from the list.
b. Select Create new, and enter the name of a resource group.


Create Linked Service to On-Premise SQL Server Source

Create Linked Service to Azure Synapse Analytics (Formerly SQL DW Sink)

Create Source Dataset
This dataset will connect to the source metadata table that contains the table names to copy.


Create Sink Dataset
This dataset will connect to the sink Azure Synapse Analytics where the tables will be copied to.


a. For Table, check the Edit option, click into the table name input box, then click the Add dynamic content link below.
b. In the Add Dynamic Content page, click the DWTableName under Parameters, which will automatically populate the top expression text box @dataset().DWTableName, then click Finish. The tableName property of the dataset is set to the value that’s passed as an argument for the DWTableName parameter. The ForEach activity iterates through a list of tables, and passes one by one to the Copy activity.

c. Update the Connection to use the newly created parameter

Create Pipeline to Iterate and Copy Tables
Create the IterateAndCopySQLTables pipeline which will take a list of tables as a parameter. For each table in the list, it copies data from the on-prem table in SQL Server to Azure SQL Data Warehouse using staged copy and PolyBase.

a. Click + New.
b. Enter tableList for the parameter name.
c. Select Array for Type.
a. In the General tab at the bottom, enter IterateSQLTables for Name.
b. Switch to the Settings tab, click the input box for Items, then click the Add dynamic content link below.
c. In the Add Dynamic Content page, collapse the System Variables and Functions sections, click the tableList under Parameters, which will automatically populate the top expression text box as @pipeline().parameter.tableList. Then click Finish.

d. Switch to Activities tab, click Add activity to add a child activity to the ForEach activity.
Create Pipeline to Get Table List and Trigger Copy Data pipeline
Create the GetTableListAndTriggerCopyData pipeline which will perform two actions:
a. Enter LookupTableList for Name.
b. Enter Retrieve the table list from Azure SQL database for Description.
a. Select AzureSqlDatabaseDataset for Source Dataset.
b. Select Query for Use Query.
c. Enter the following SQL query for Query.
|
1 |
SELECT TableSchema as TABLE_SCHEMA, TableName AS TABLE_NAME FROM DataFactoryMeta WHERE Active = 1 |
d. Clear the checkbox for the First row only field.

a. Select IterateAndCopySQLTables for Invoked pipeline.
b. Expand the Advanced section.
c. Click + New in the Parameters section.
d. Enter tableList for parameter name.
e. Click VALUE input box -> select the Add dynamic content below ->
enter@activity(‘LookupTableList’).output.value as table name value -> select Finish. You’re setting the result list from the Lookup activity as an input to the second pipeline. The result list contains the list of tables whose data needs to be copied to the destination.

Trigger Pipeline
Now that the pipelines are configured, it’s time to run them.


Azure Synapse Analytics (Formerly SQL DW) Unsupported Data Types
The following data types are unsupported in Azure Synapse Analytics:
|
1 |
'geography','geometry','hierarchyid','image','text','ntext','sql_variant','xml' |
These can be identified in your source database via the following query:
|
1 2 3 4 5 6 |
SELECT t.[name], c.[name], c.[system_type_id], c.[user_type_id], y.[is_user_defined], y.[name] FROM sys.tables t JOIN sys.columns c on t.[object_id] = c.[object_id] JOIN sys.types y on c.[user_type_id] = y.[user_type_id] WHERE y.[name] IN ('geography','geometry','hierarchyid','image','text','ntext','sql_variant','xml') AND y.[is_user_defined] = 1; |
The workarounds for these data types are listed below:


References
https://docs.microsoft.com/en-us/azure/data-factory/quickstart-create-data-factory-portal
https://docs.microsoft.com/en-us/azure/data-factory/tutorial-bulk-copy-portal
https://docs.microsoft.com/en-us/azure/sql-data-warehouse/sql-data-warehouse-tables-data-types
Questions?
Thanks for reading. We hope you found this blog post to be useful. Do let us know if you have any questions or topic ideas related to BI, analytics, the cloud, machine learning, SQL Server, (Star Wars), or anything else of the like that you’d like us to write about. Simply leave us a comment below, and we’ll see what we can do!
Keep Your Business Intelligence Knowledge Sharp by Subscribing to our Email List
Get fresh Key2 content around Business Intelligence, Data Warehousing, Analytics, and more delivered right to your inbox!
Key2 Consulting is a data warehousing and business intelligence company located in Atlanta, Georgia. We create and deliver custom data warehouse solutions, business intelligence solutions, and custom applications.


I had high hopes for this being a solution for my use case. I have faithfully attempted to create the entities in the above tutorial. There are a number of places where the text appears to be either out of order, or missing key elements.
To summarize:
Create Source Dataset
You create a dataset to read in the tableList, but then at 4.a.-b. you talk about a sink dataset, and then immediately thereafter appears “Create Sink Dataset”. It seems as 4. should have been deleted…
Create Sink Dataset
It appears you have the wrong image under #3.
Create Pipeline to Iterate and Copy Tables
No steps listed after #5, skipping entirely the configuration of Source, Sink, Mapping, or Settings options.
Create Pipeline to Get Table List and Trigger Copy Data pipeline
Step 6.e. does not validate — “Invalid Position 11 Unrecognized expression: ‘LookupTableList’” error message.
Step 8. — fails to validate per above.
I respectfully offer that you should either correct and update this page, or take it down entirely. In it’s current form, I consider it a hazard, as I have spent significant time trying to understand and follow it before realizing it is not actionable.
Hi Richard,
Thank you very much for your comment and feedback. We apologize that this blog post had errors, and are sorry for any inconvenience this may have caused you. We reviewed your detailed feedback and have made several changes and updates to this post.
Sincerely,
The Key2 Consulting Team
The code works however the quotation marks have to be redone.