By: Syed Islam
What are Metadata-Driven Pipelines in Microsoft Fabric?
Metadata-driven pipelines in Microsoft Fabric offer flexibility, reusability, and scalability in data integration processes. They use metadata to automatically adjust data flows and transformations, making it easier to handle changes in data sources and formats.
By leveraging metadata, these pipelines can dynamically adapt to new data requirements without the need for extensive manual reconfiguration. This approach ensures consistency, scalability, and efficiency in managing data integration processes.
Our company has implemented metadata-driven pipelines multiple times for clients (including for one of the largest healthcare organizations in the country), so we’ve seen firsthand how useful they can be. They reduce the need for hardcoded logic, minimize unwanted pipeline duplication, help save time by automating workflow execution, and even enhance data governance and consistency.
Prerequisites
Before we begin building metadata-driven pipelines in Microsoft Fabric, ensure you have the following:
Microsoft Fabric Account: You need an active Microsoft Fabric account. If you don’t have one, you can sign up for a free trial to explore its features.
JSON File: Download the git.json file from this GitHub repository. This file contains the metadata needed for the pipeline.
Microsoft Fabric Workspace: A dedicated workspace in Microsoft Fabric where you will create and manage your Lakehouse and pipelines.
Step 1: Log in to the Microsoft Fabric Portal
Log in to your Microsoft Fabric account. Navigate to the “Workspaces” section in the Microsoft Fabric Portal and select a dedicated workspace.
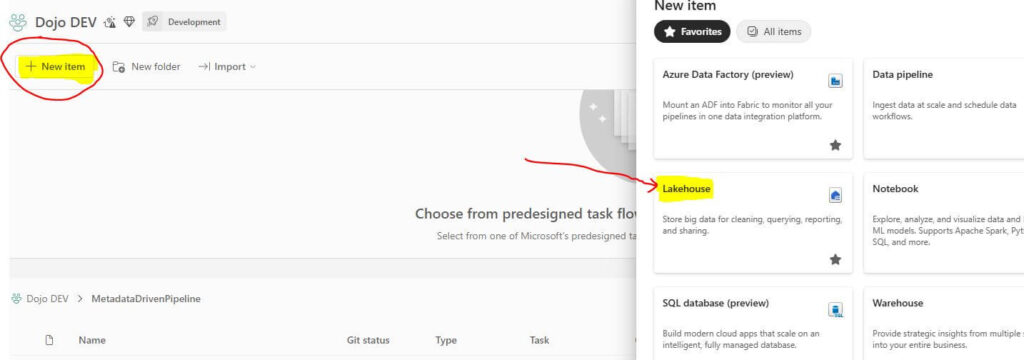
Step 2: Create a Lakehouse
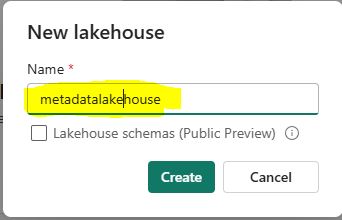
Within your workspace, click on the “New item” button from the tool menu.
Select “Lakehouse” and provide a name.
Click the “Create” button.
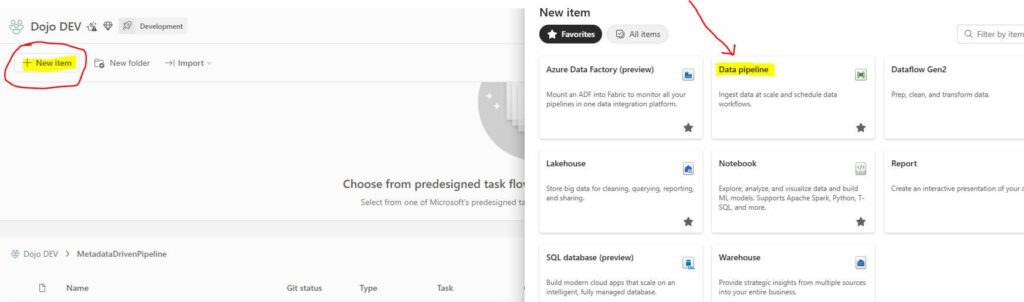
Step 3: Create a New Pipeline
Log in to your workspace and select “New item”. Then select “Data pipeline”. Enter a name for the pipeline.

Step 4: Download the Metadata File
Download the git.json file from https://github.com/moinny/adventureworkdata/blob/main/git.json.
As part of the setup process, we will download a JSON file that has all the metadata file formats and their API URLs.
This JSON file will be the core of our pipeline, allowing us to process data dynamically and easily connect with different data sources.
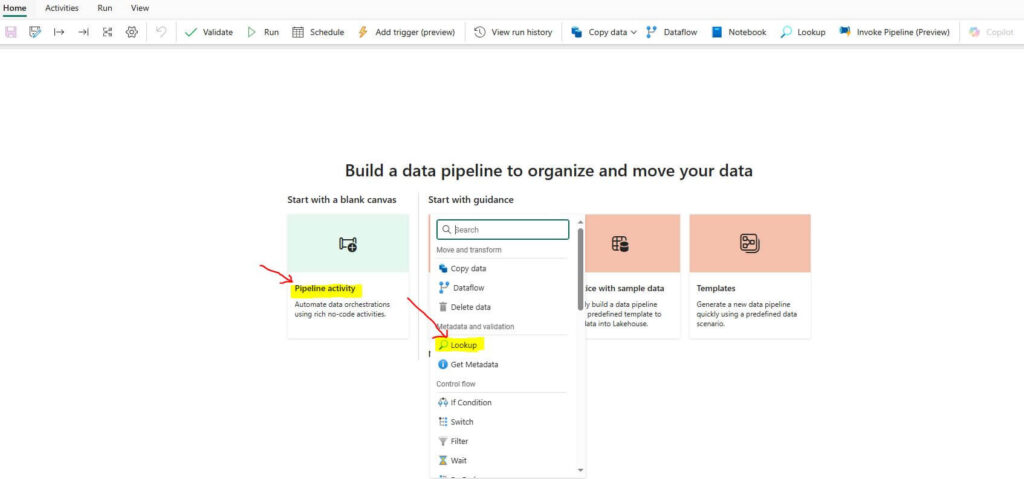
Step 5: Create a Lookup Activity
Select Lookup Activity from the Pipeline activity pane:
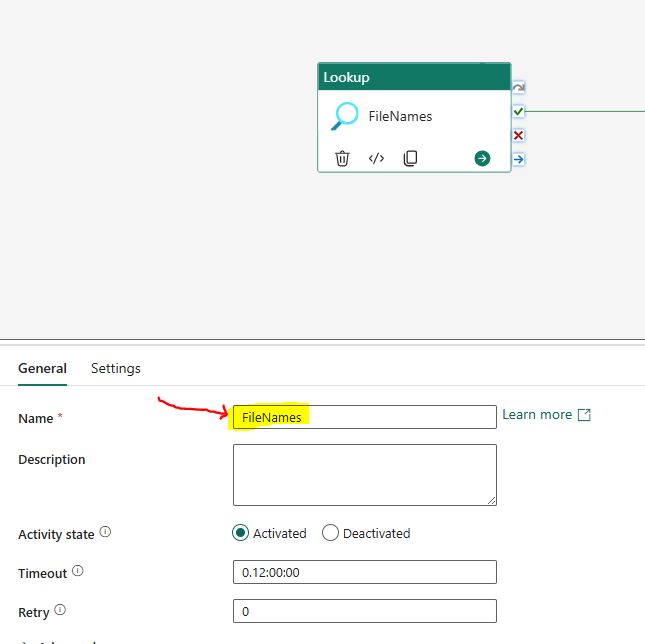
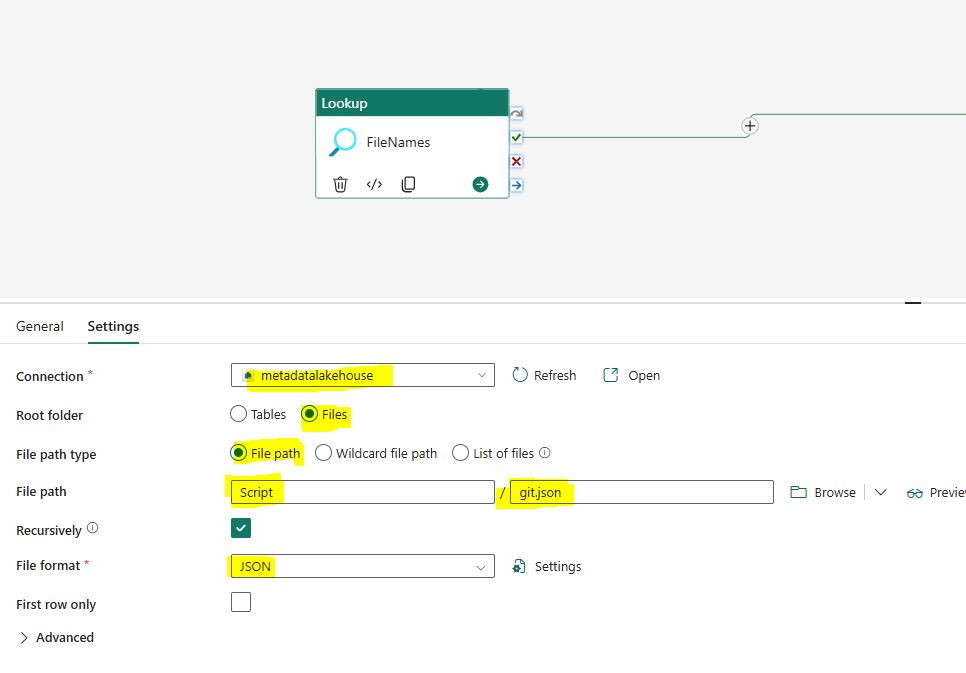
Rename the lookup activity as “FileNames”.
In the “Settings” properties, select “metadatalakehouse” as connection.
Select “Files” as the root folder.
Browse and select the file “git.json” from the lakehouse.
Select “JSON” as the file format.
Now, let’s explore the git.json file being used to create the metadata-driven pipeline in Microsoft Fabric. This JSON file contains a list of datasets, each with specific details. Each dataset includes:
p_rel_url: The relative URL of the dataset in a GitHub repository.
p_sink_folder: The folder where the dataset will be saved.
p_sink_file: The name of the file to be saved.
For example, one entry in the JSON file is:
|
1 2 3 4 5 |
{ "p_rel_url": moinny/adventureworkdata/refs/heads/main/AdventureWorks_Product_Categories.csv", "p_sink_folder": "AdventureWorks_Product_Categories", "p_sink_file": "AdventureWorks_Product_Categories.csv" } |
This setup helps organize and retrieve datasets easily from a GitHub repository, making the data processing workflow smooth and efficient. Using this metadata-driven approach ensures consistency and scalability in managing data.
Step 6: Create a “For Each” Activity
Drag a “ForEach” activity onto the pipeline canvas.
Connect the lookup activity to the “ForEach” activity by dragging the green arrow to the “ForEach” activity to establish the connection.
From the “General” tab, modify the name to “For All Files”.
Connect the lookup activity to the “ForEach” activity.
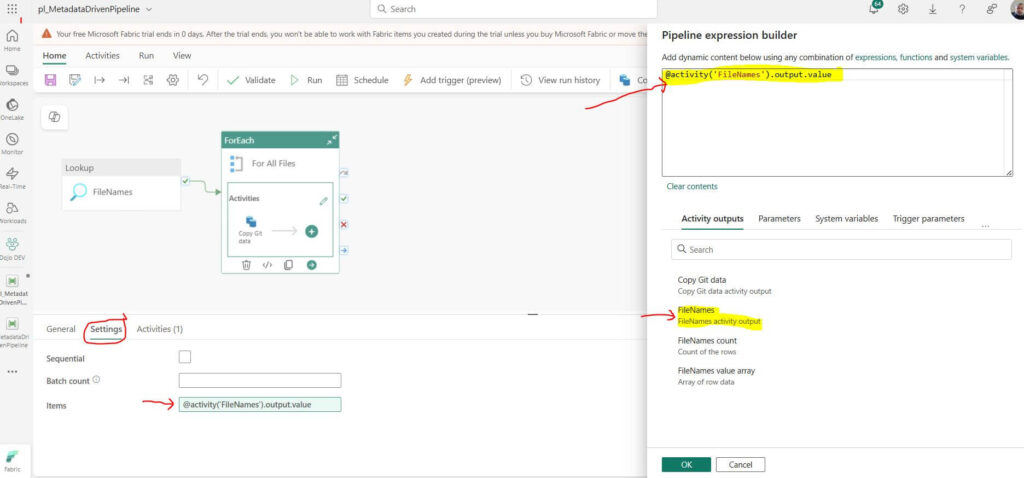
Click on the “Settings” tab. Click on the “Items” property. A new pipeline expression builder dialog window opens up on the right pane.
From the “Activity output” tab, select the “FileNames” lookup activity output we previously set up.
Add “value” at the end of the script: @activity(‘FileNames’).output.value
Step 7: Create and Set Up Copy Activity
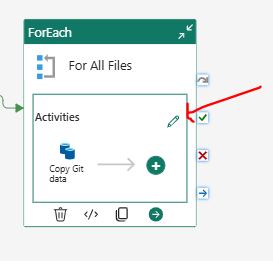
Click on the pencil icon next to the “Activities” field to open the “ForEach” activity’s inner pipeline.
Drag and drop a “Copy activity” onto the canvas.
In the General tab, rename the activity name as “Copy Git Data”.
Click on the “source” tab and set up the following properties:
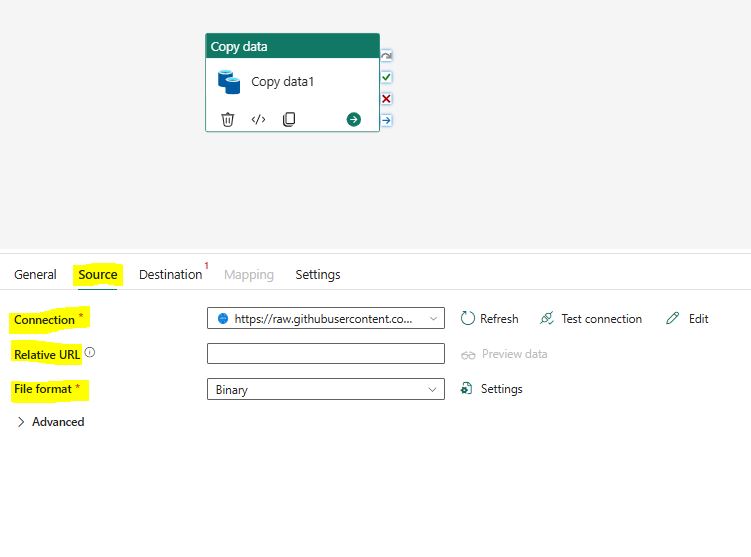
Setup Connection: Select “More” from the Connection list.
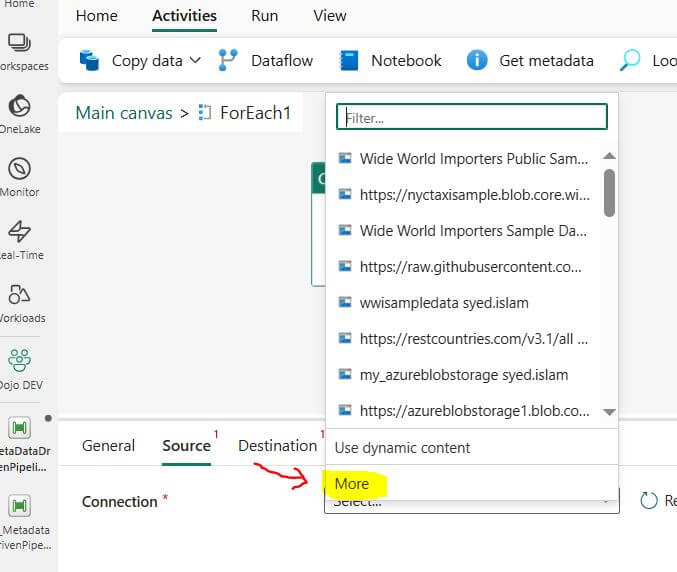
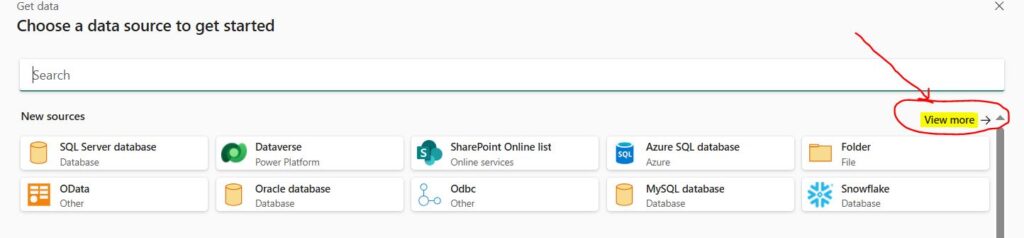
From the upper right pane, click on the “View more” button.
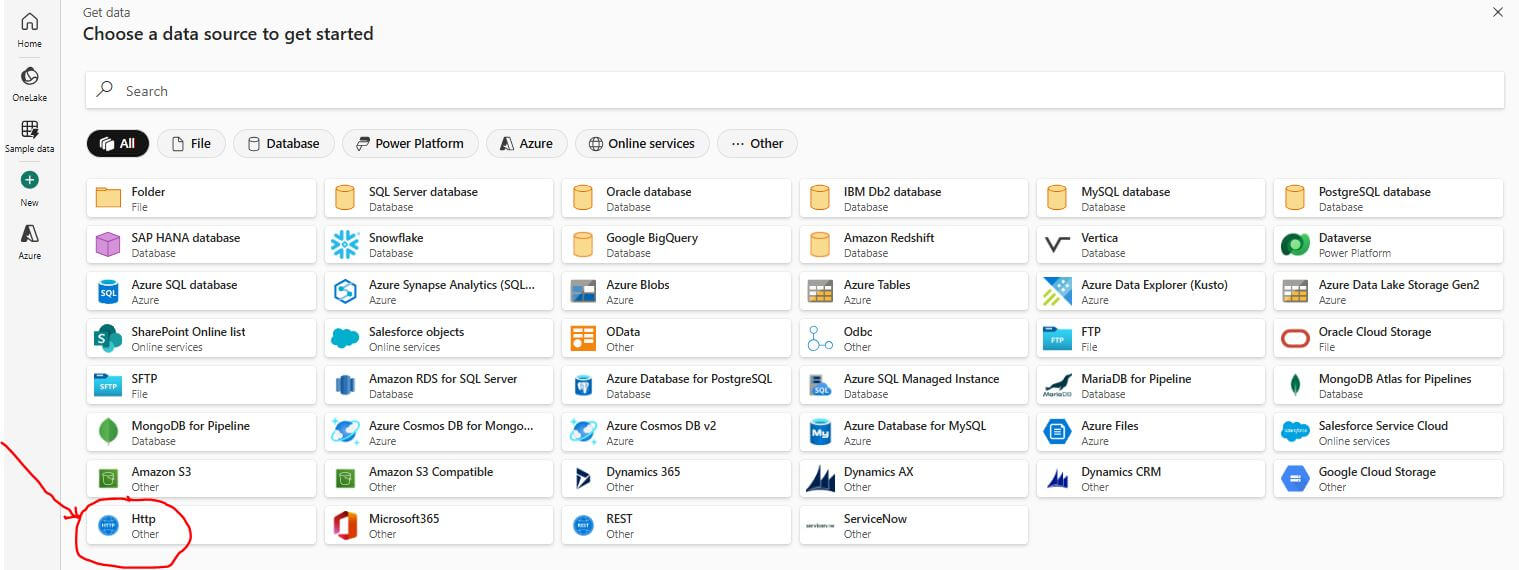
Select “Http” as the data source.
In the “Connection” settings, enter https://raw.githubusercontent.com/ as the url.
Enter ‘github_conn’ as the “Connection name”.
Click on “Connect”.

Relative URL: Click on “Add dynamic content” to open the “Pipeline expression builder” dialog window. Enter the expression “@item().p_rel_url”. Click OK.
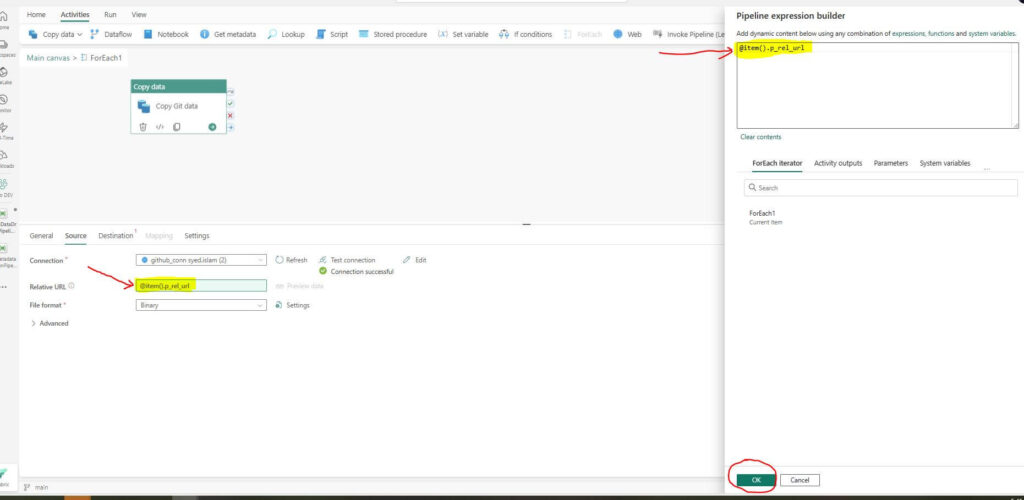
The “p_rel_url” is defined in a JSON file. The Lookup activity reads this file and retrieves the p_rel_url value. The ForEach iterator then loops through each item, extracting the p_rel_url for each iteration. The Copy activity uses this value, dynamically setting the source’s Relative URL property for each data transfer.
File format: Select “DelimittedText” as the file format.

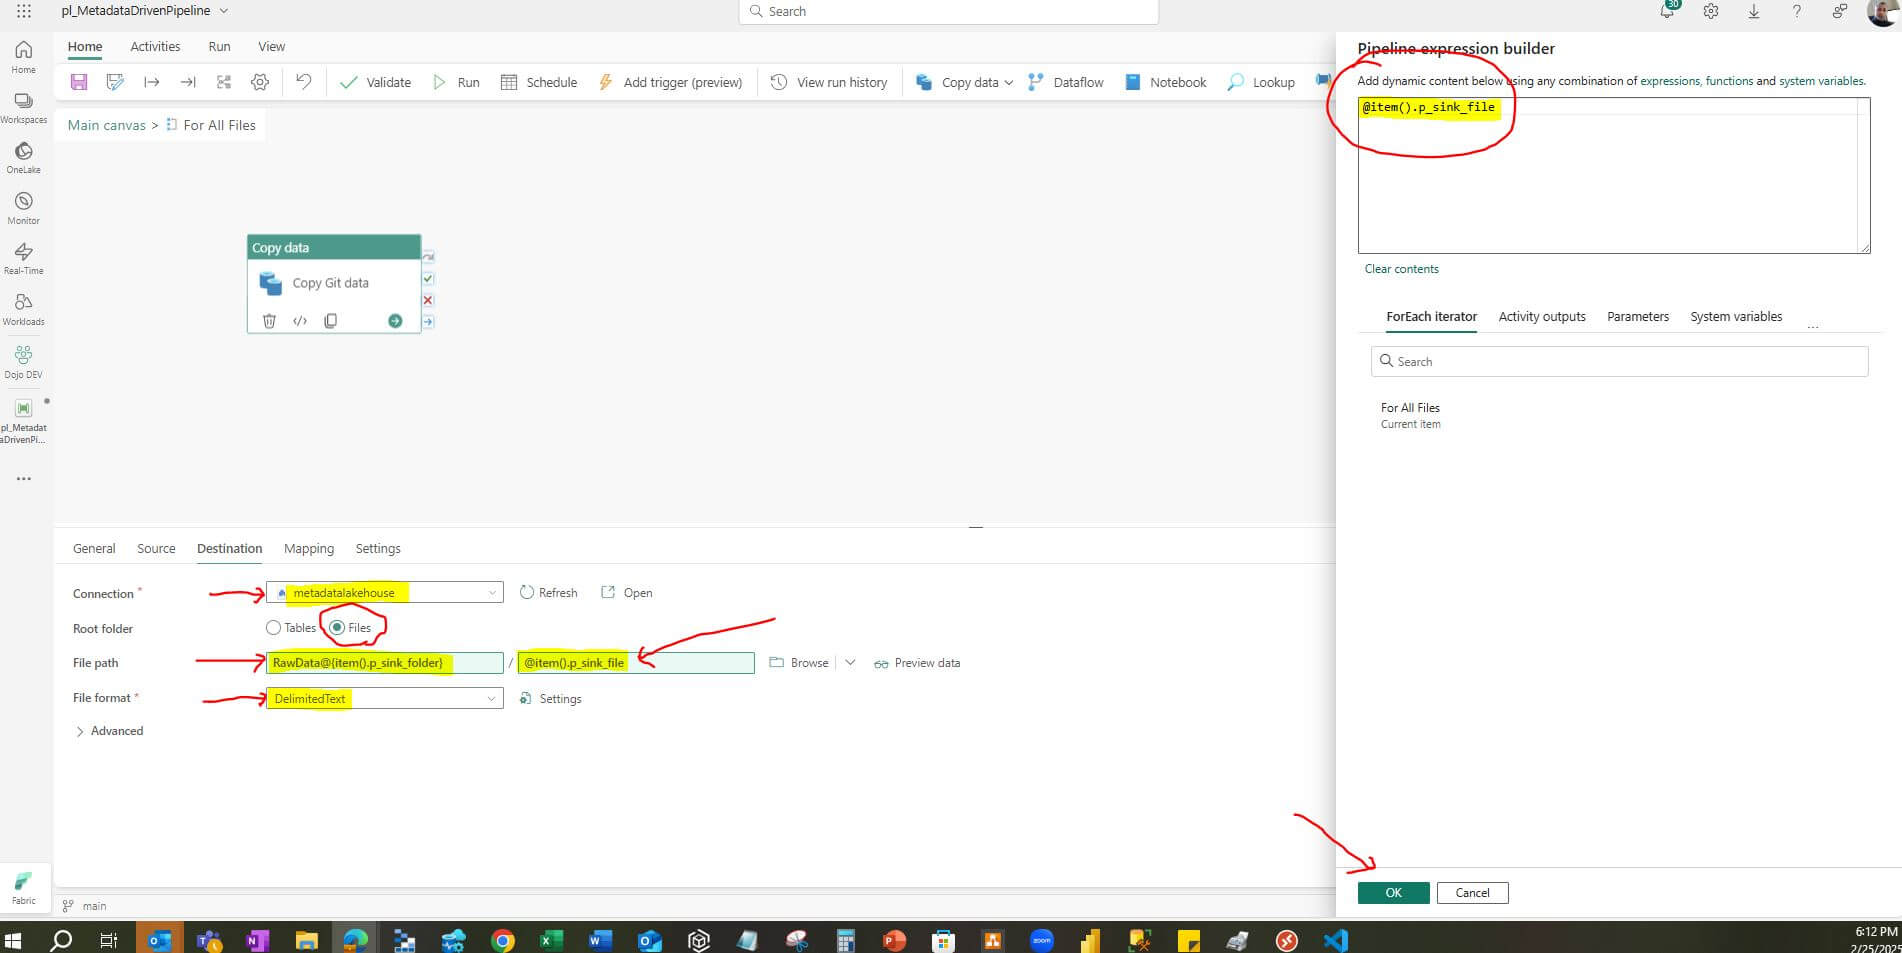
Click on the “Destination” tab and set up the following properties:
Connection: Select the lakehouse “metadatalakehouse” we created previously.
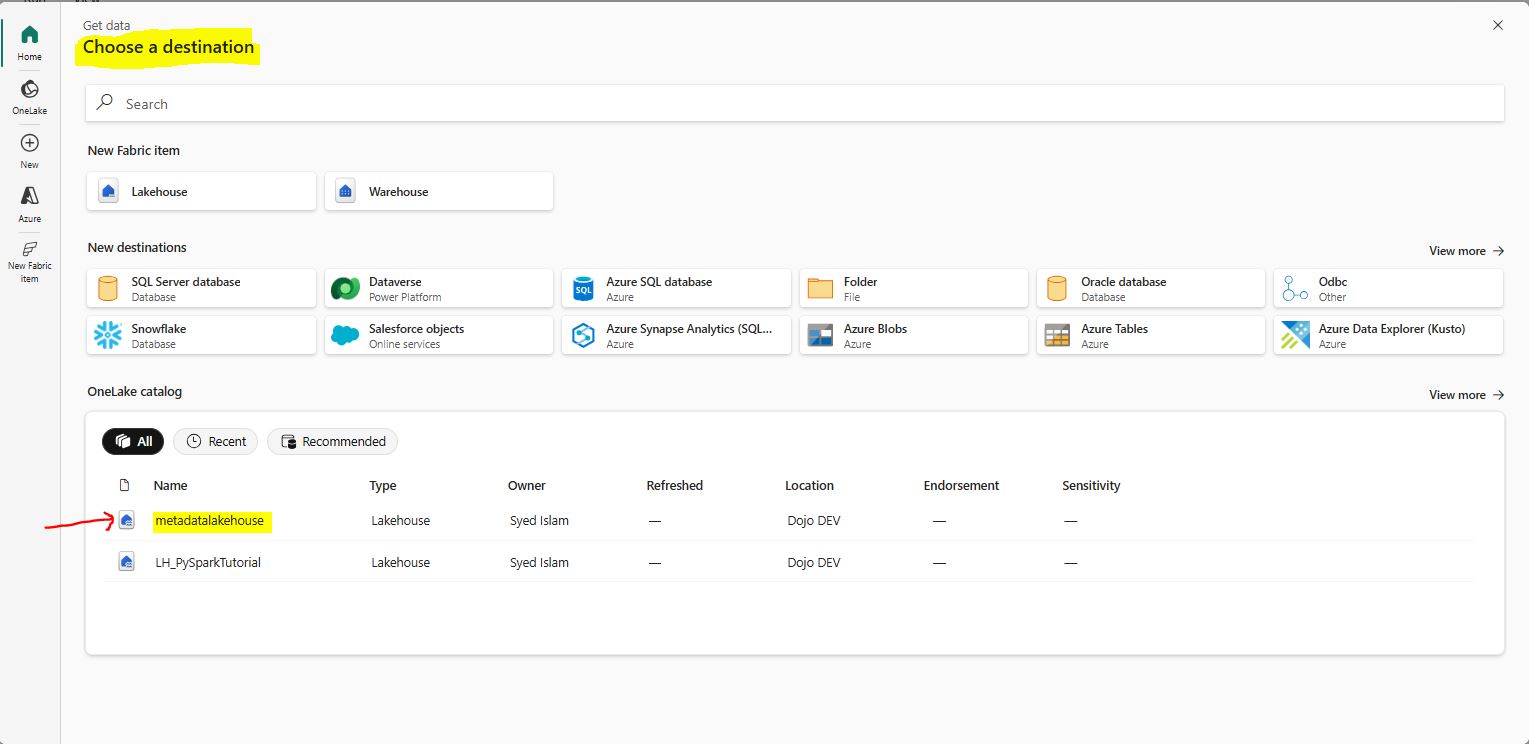
Root folder: Select “Files” as the root folder.
File path: In the “Directory” input box, click on “Add dynamic content” to open the “Pipeline expression builder” dialog window. Enter the expression “RawData@{item().p_sink_folder}”. Click OK.
In the “File name” input box, click on “Add dynamic content” to open the “Pipeline expression builder” dialog window. Enter the expression “@item().p_sink_file. Click OK.
File format: Select “DelimittedText” as the file format.
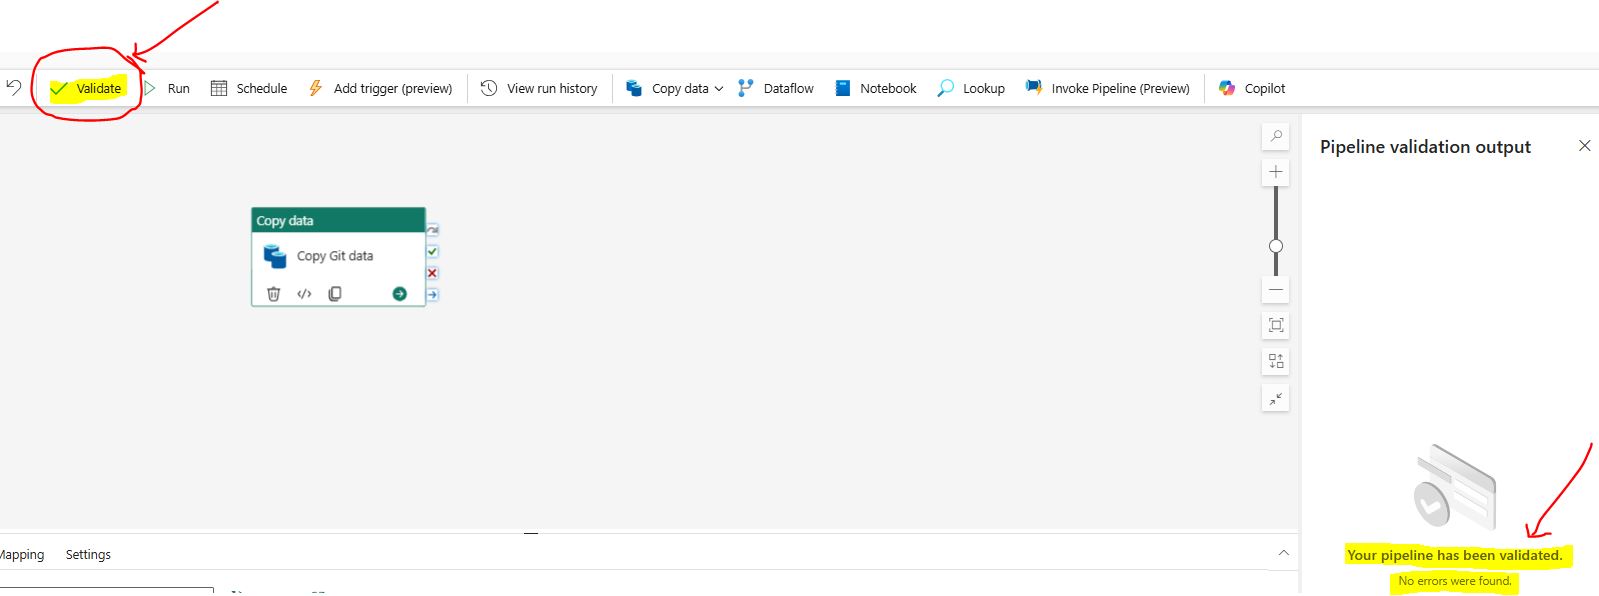
Step 8: Validate the Pipeline
After setting up the Copy activity, validate the pipeline to ensure there are no errors. Click on the “Validate” button in the toolbar and resolve any identified issues.
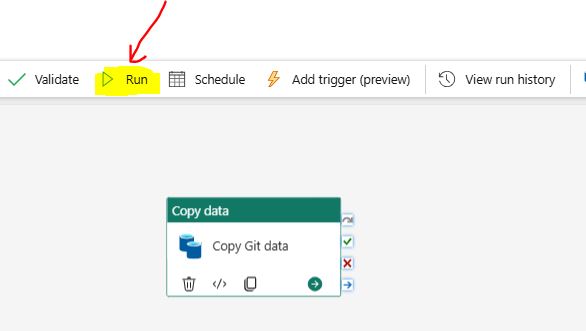
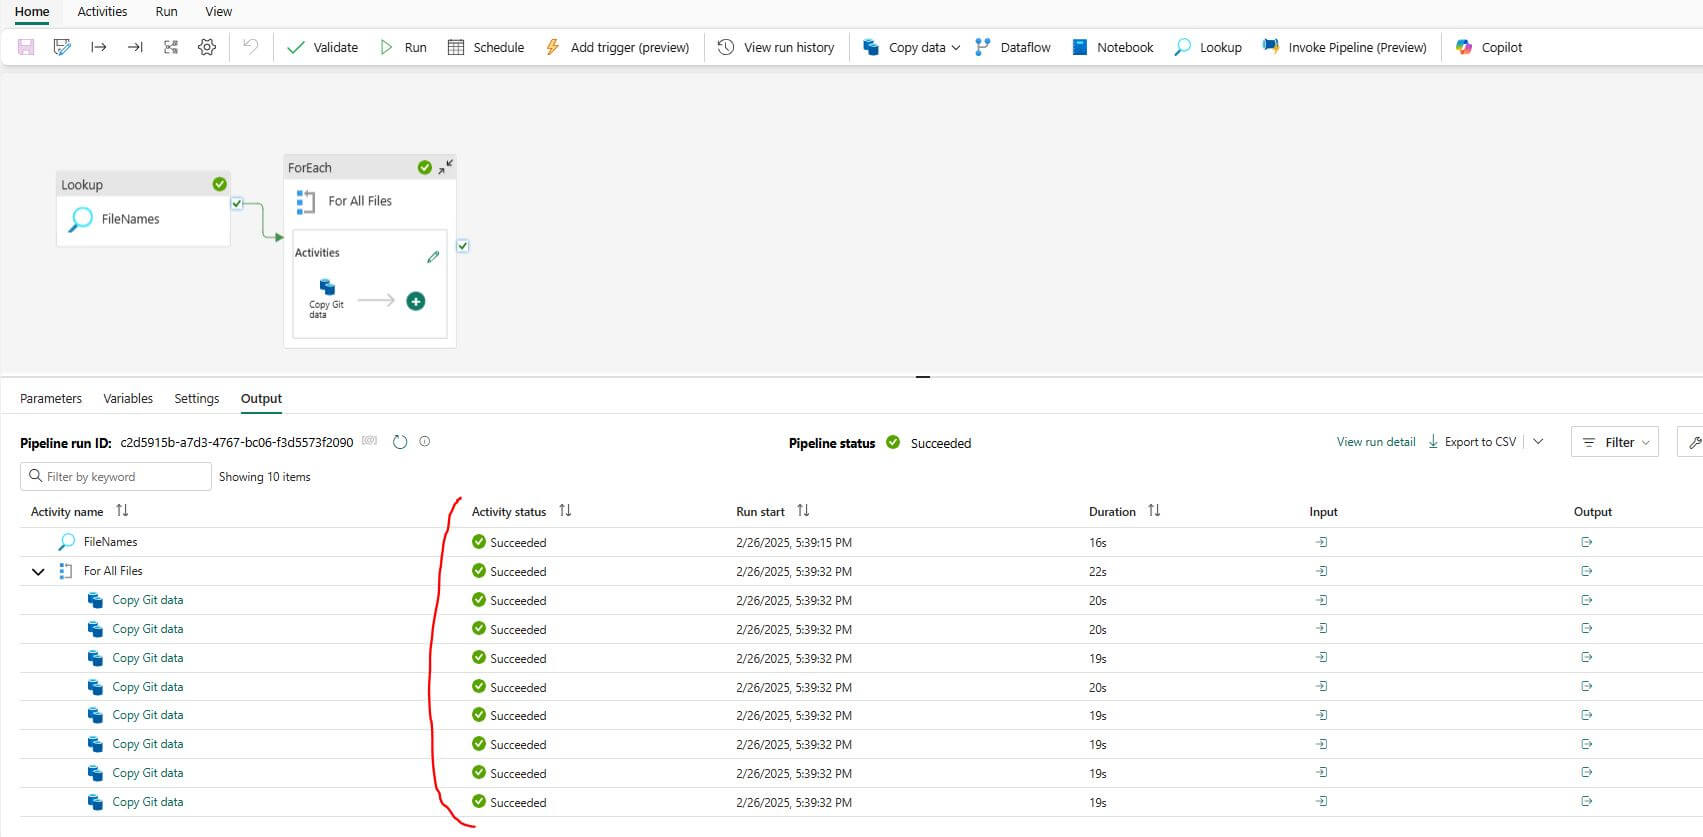
Step 9: Run the Metadata-Driven Pipeline
After validating the pipeline, run it manually to test its functionality. Click on the “Run” button in the toolbar.
Step 10: Monitor the Pipeline and Check Output in Microsoft Fabric Lakehouse
After running the pipeline, monitor its progress to ensure it processes the data correctly.
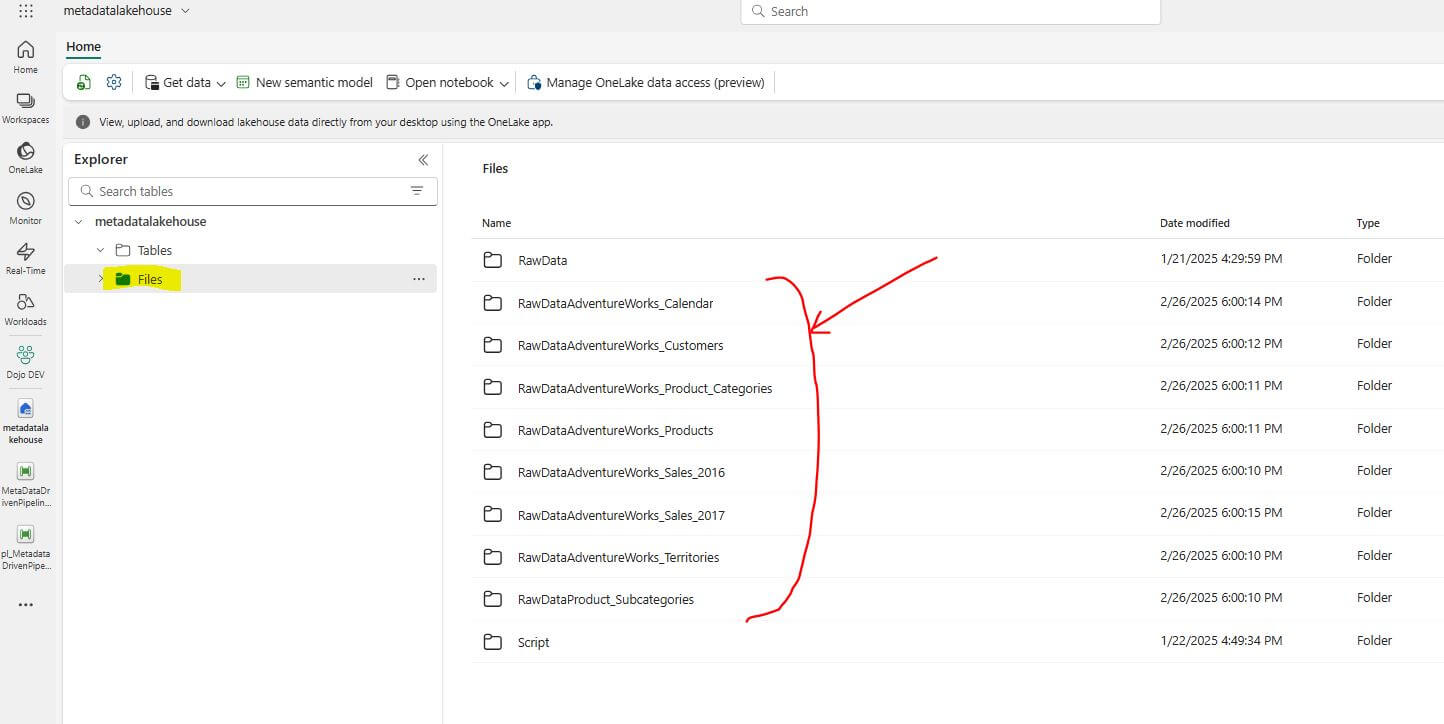
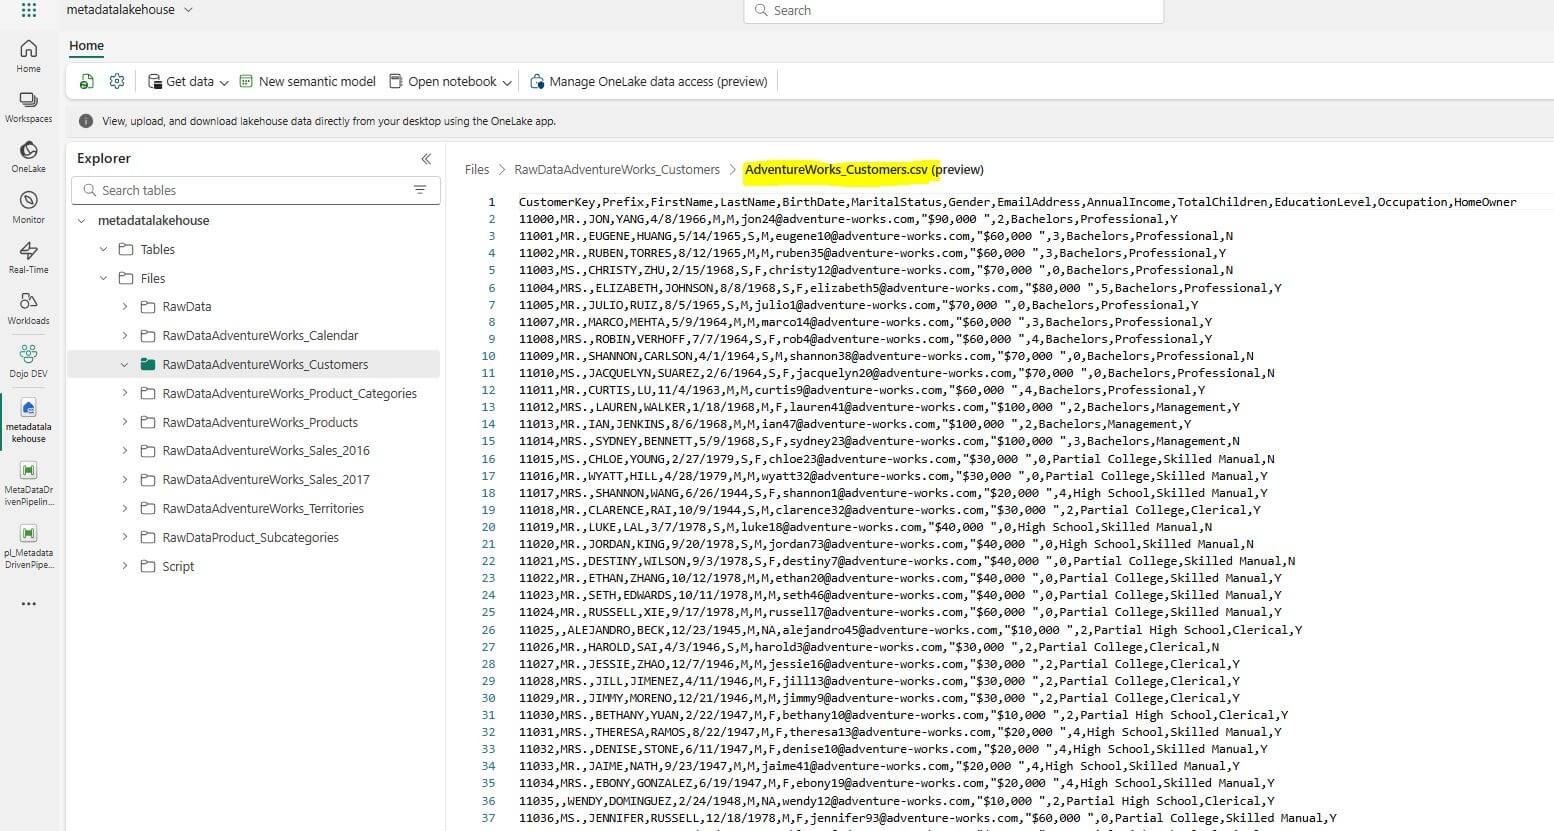
In the Lakehouse, navigate to the “Files” section.
Browse through the folders and locate the files that were created by the pipeline.
Open the files to verify that the data has been processed and saved correctly.
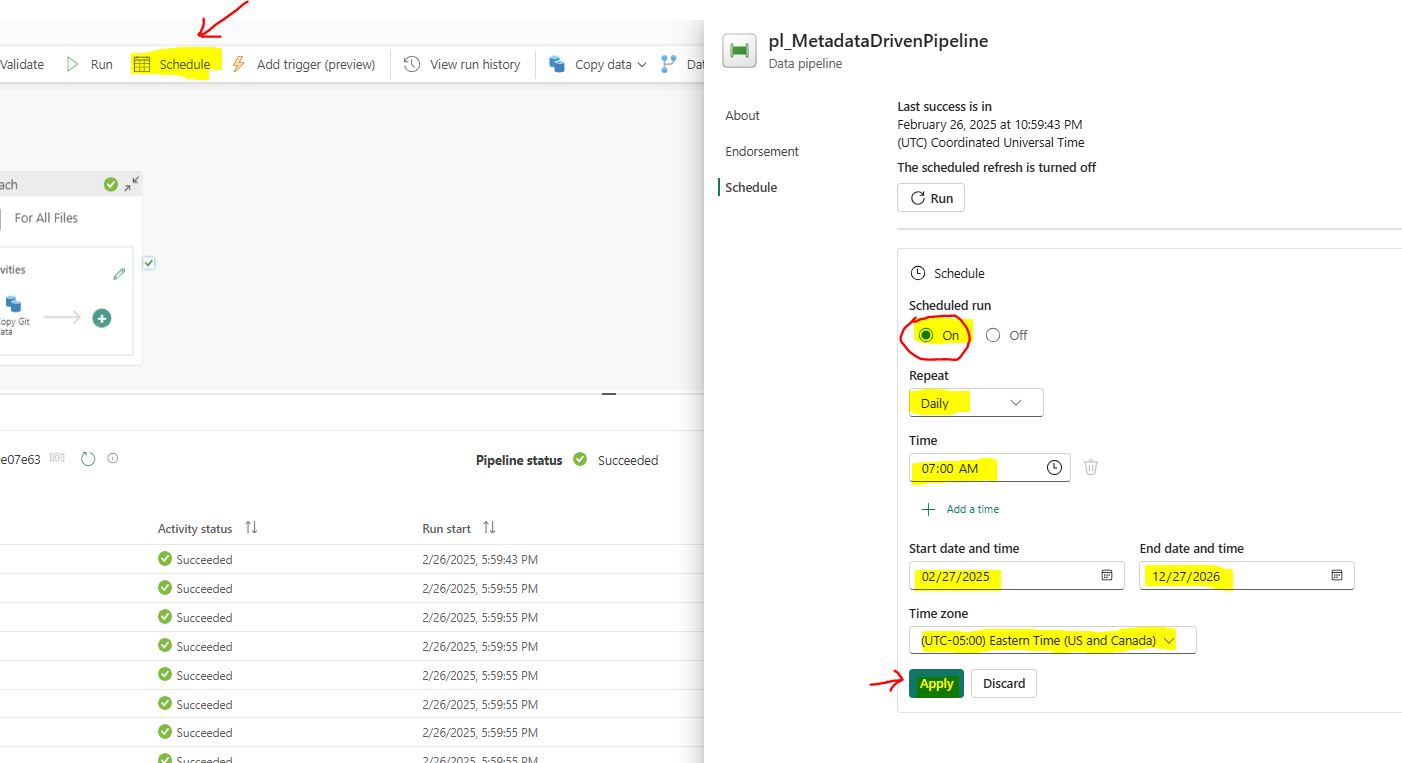
Step 11: Schedule the Pipeline
To automate the data processing, schedule the pipeline to run at regular intervals.
Click on the “Schedule” button in the toolbar.
Select “On”.
Set the desired schedule, such as daily, weekly, or monthly, and configure the time and frequency.
Click on “Apply” to save the schedule.
Conclusion
Metadata-driven pipelines in Microsoft Fabric are a powerful way to manage and process data efficiently. By using metadata, these pipelines become flexible, reusable, and scalable, making it easier to handle changes in data sources and formats. This blog post has guided you through the steps to create such a pipeline, from setup to execution.
With these pipelines, you can automate data workflows, reduce manual effort, and ensure consistency across your data processes. Additionally, they enable better data governance and compliance by providing a clear structure and documentation for your data operations.
For more information on data integration in Microsoft Fabric using data pipelines, check out another one of our blog posts, Microsoft Fabric Data Integration Using Pipelines, Dataflow Gen2, and Notebooks.