Author: Kevin McAteer
The Challenge
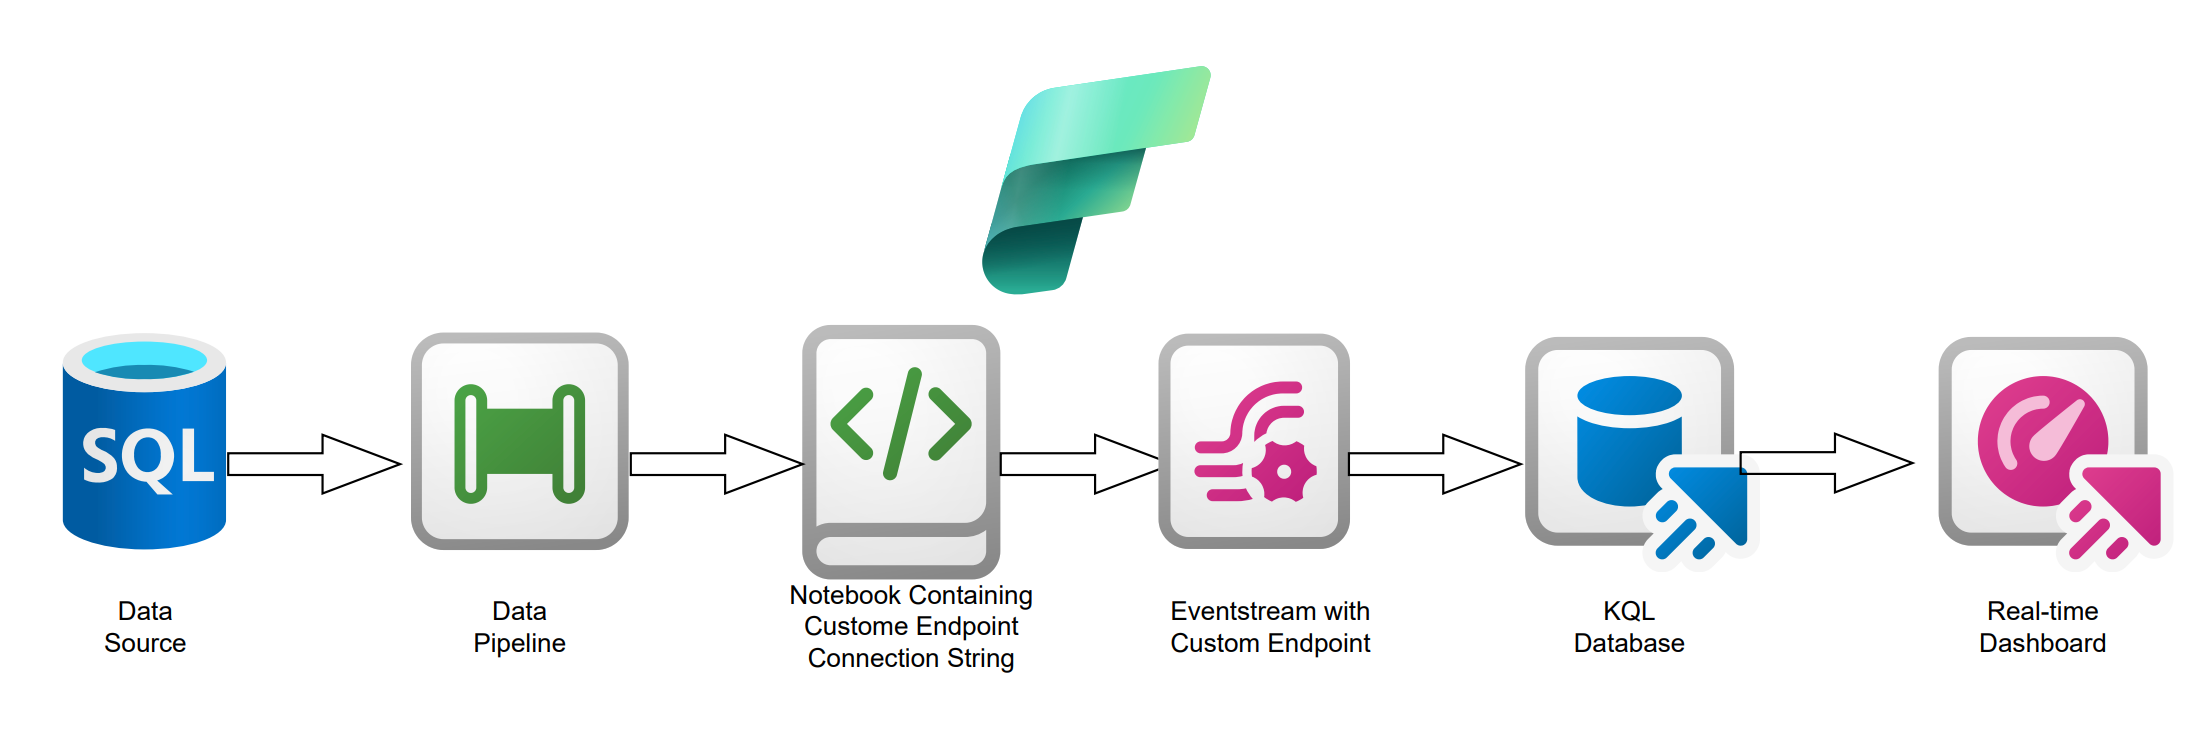
Setting up a connection between Fabric pipelines and an Eventstream custom endpoint is a simple task. (If you are unfamiliar with Eventstreams in Fabric, you can find more information here: Microsoft Fabric event streams overview – Microsoft Fabric | Microsoft Learn.) You can simply use the SaS Key connection provided within your custom endpoint, utilize it within a notebook that takes pipeline parameters and then sends it to your custom endpoint. It then gets sent to your database destination. Below is a visual of what this process looks like.
This was our first solution, quick and easy. The problem with this method is security. The SaS Key connection is hard coded and can be easily accessed just by opening the notebook. It would be great to utilize the Entra ID Authentication through the EventHub protocol. This way, we can integrate Azure Key Vault and have a Service Principal for Azure EventHub to establish a secure connection – but at this point in Fabric’s life cycle it’s difficult to access Key Vault.
Despite everything great about Microsoft Fabric, it offers limited integration with Key Vault since day one which can be frustrating to users who require tighter security for their processes. Additionally, there is limited documentation on how to go about integrating with Key Vault at all as the current connection method is in preview. This has made authentication using SPN difficult – but fortunately, there’s a solution. The answer is API calls.
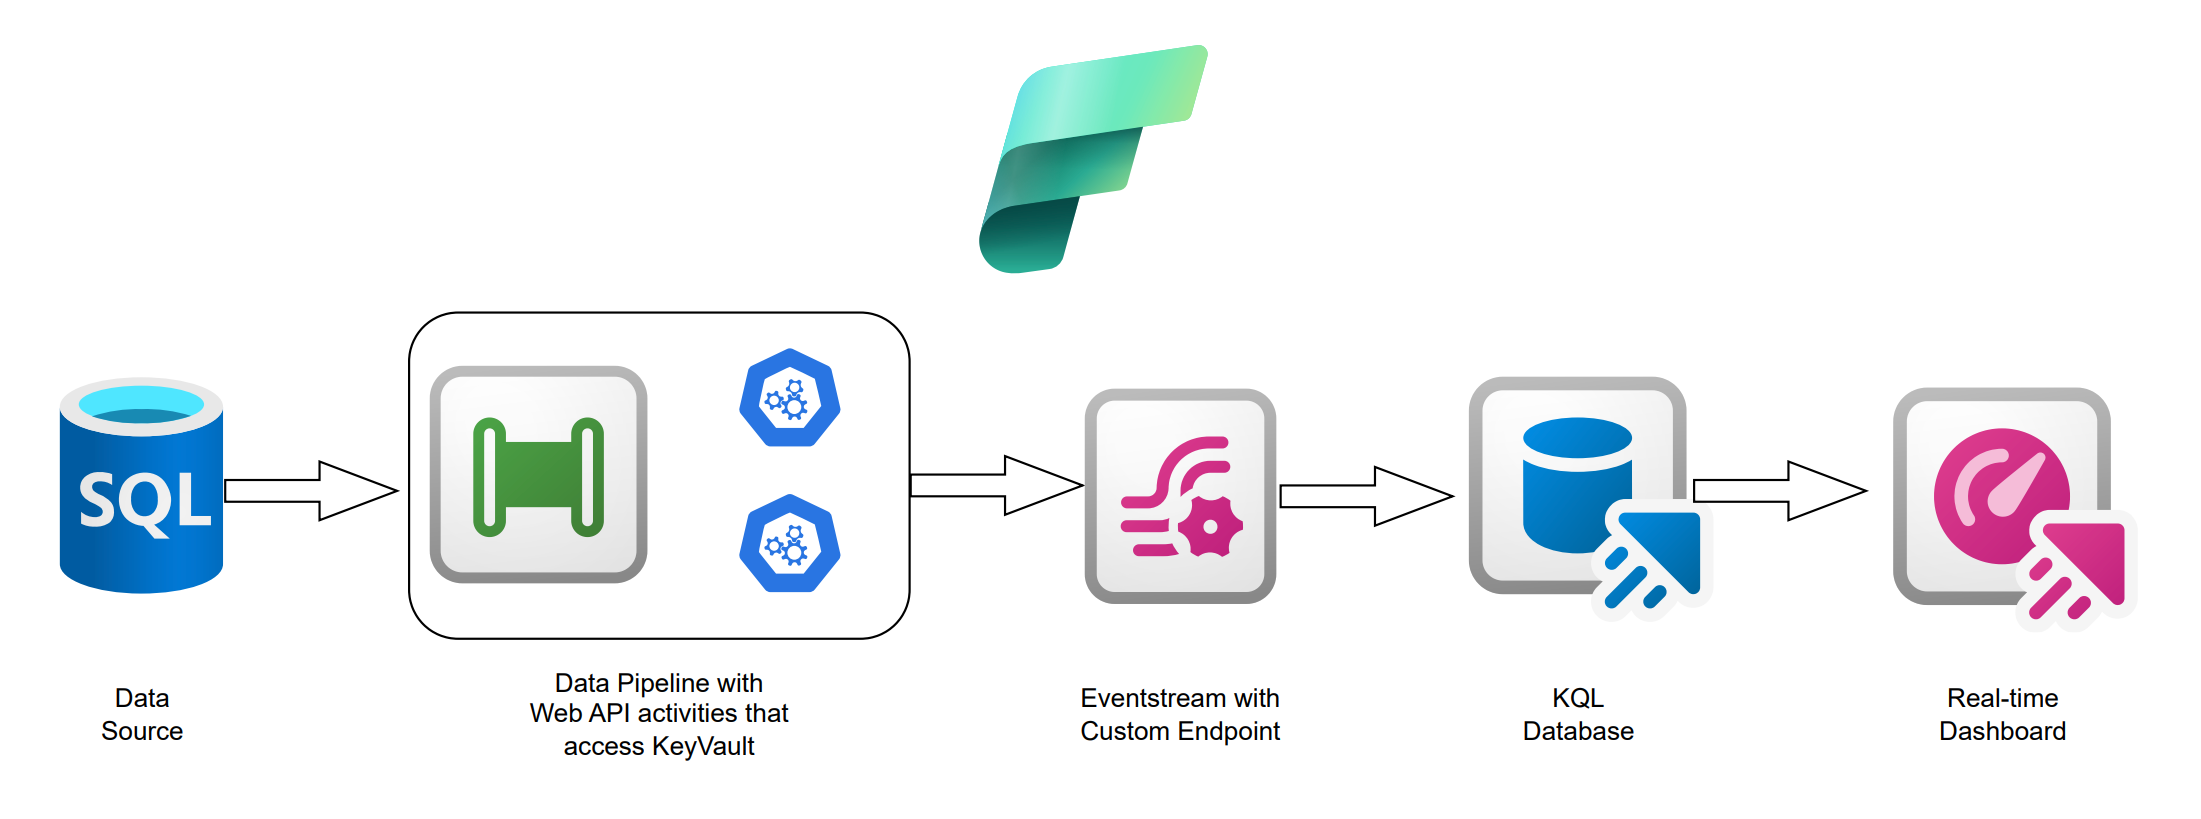
This article will provide detailed steps and examples of how to use SPN authentication when calling an API to retrieve SPN credentials for Key Vault, thus providing much needed security. Below is an illustration of what this process looks like.
Steps:
The end goal of each of the following steps is to produce a pipeline that houses API calls that have secured connections to Azure Key Vault. The pipeline then sends the data securely to your Custom Endpoint. It will look like this:
STEP 1: SERVICE PRINCIPLE
Create Service Principal(App Registration) – If you are unfamiliar with creating a Service Principal, you can find more information on how to do so here: How to register an app in Microsoft Entra ID – Microsoft identity platform | Microsoft Learn
Now that your Service Principal is created, take note of your Tenant ID (Directory (tenant) ID) and your Client ID (Application (client) ID). Additionally, you will need to add this SPN to your Fabric workspace users as a contributor under “Manage access.
Create Secret:
- For Microsoft Fabric to authenticate with Azure Key Vault, a secret is required. This secret is used to request access tokens for authentication.
- Within the “Certificates & Secrets” portal located in your Service Principal, select “New client secret.” Add a description and an expiration policy.
- IMPORTANT NOTE: When you create your secret, you will be provided with the value just once, so save it somewhere secure. I like to use KeePass as it is securely encrypted, and you only need to memorize the password of your personal KeePass database. When you navigate away from your newly created secret, you will not be able to view or retrieve the secret value, and you will need it for the steps for the Key Vault.

STEP 2: AZURE KEY VAULTS
Store Client Secrets
- Navigate back to your resource group that contains your Fabric Capacity. If you do not have a Key Vault, create one. Then navigate to “Secrets” under “Objects” in the left-hand pane.
- Then select “Generate/Import” to store your secret created through your Service Principal. You will see this screen below, where you can name your secret and enter the value of the secret that you took note of in the prior steps. You will also want to set an expiration date that would fit your organization’s security guidelines. For this blog, we will just set a 2-year limit that is generated automatically in Eastern time.
- You may recall that previously, when you created your secret within Service Principal, you were unable to retrieve that value. However, this value can be revealed from within Key Vault.
- Now that your secret is stored, navigate to your newly created secret and see your new secret identifier and take note of this for later use.
Store Client Secret ID – Repeat the steps to store your secret, instead for your client ID, and take note of its identifier.
Add Role Assignment in Key Vault – This is an important step to allow your Key Vault connection in step three to authenticate with Azure Key Vault using your previously created Service Principal. Within your Azure Key Vault, under “Access control (IAM),” add your service principal as a Key Vault Secrets User role assignment. This will provide your service principal with the necessary permissions.
STEP 3: MAKE CONNECTIONS TO BE UTILIZED WITHIN THE PIPELINES ORCHESTRATING THE API CALLS.
Create Key Vault Connection – The connection to Key Vault will be used to retrieve both the secret you created through Service Principal and the client ID, both of which we stored in Key Vault.
- Navigate to “Manage connections and gateways” through the Fabric settings.
- Click the “+New” option to create a new connection. Then select the “Cloud” option, name your connection, and select the “Web v2” connection type.
- You may recall taking note of your Key Vault URI in the previous steps. Use this with “secrets” added to the end of the URI for the Base Url with “https://vault.azure.net” added to the Token Audience Uri.
- The authentication method for this connection will be a service Principal. You will need your Tenant ID, Service Principal ID (The client ID of your organization’s service principal), and the Service Principal Key (This is the client secret value of your service principal). Use the Service Principal created in the previous steps as your service Principal.
- Finally, the Privacy level should be Organizational.
Create Token Connection – Now that you have a Key Vault connection to retrieve your secret and client ID, you will need a connection that will retrieve a token.
- Navigate to “Manage connections and gateways” through the Fabric settings.
- Click the “+New” option to create a new connection. Then select the “Cloud” option, name your connection, and select the “Web v2” connection type.
- For the base URL, you will need to create a URL that looks like this with your Tenant ID https://login.microsoftonline.com/<tenantID>/oauth2/token as your base URL and then https://eventhubs.azure.net as your Token Audience Uri.
- The Authentication method should be Anonymous.
- The Privacy level should be organizational.
STEP 4 – THE EVENTSTREAM PROCESS
You have one more connection to make, but before that, you need to create an Eventstream with a custom endpoint. As stated before, we will be using Entra ID Authentication. This will contain an EventHub namespace endpoint and EventHub name that you will need to use in the next connection you will create. This demonstration will assume you already have a KQL database set up within an Eventhouse, but you can use other destinations, such as a Lakehouse, as well.
Create Eventstream
- Within your Fabric workspace, add a new Eventstream Item. You will first need to add a custom endpoint source. You will notice that you cannot see the Entra ID Authentication information until you publish your Eventstream, so don’t worry if you don’t see anything useful at first.
- You can then add your Eventhouse destination to the desired table in your KQL database. (You may notice that your destination will require further configuration if you choose the “Direct Ingestion” Data ingestion mode, which is what I would recommend using. You can do this later if you would like, once we get data flowing through the Eventstream as a primer.)
- Once you publish your Eventstream, you can now see the EventHub Protocol option along with the Entra ID Authentication method. (Take note of the EventHub namespace endpoint and EventHub name for later use in the connections and relative URL within the future web activity.)
Create Eventstream Connection
- Navigate to “Manage connections and gateways” through the Fabric settings.
- Click the “+New” option to create a new connection. Then select the “Cloud” option, name your connection, and select the “Web v2” connection type.
- For the Base Url, take the EventHub namespace provided by the Entra ID Authentication method created on the previous step and add https:// to the beginning of the string.
- he Authentication method should be Anonymous.
- The Privacy level should be Organizational.
STEP 5 – DATA PIPELINES
Now that all the connections are established and your Eventstream is ready for data flow, we can start on the data pipelines that perform the API calls to make the custom endpoint magic work.
Create Pipeline with Web Activities for API Calls
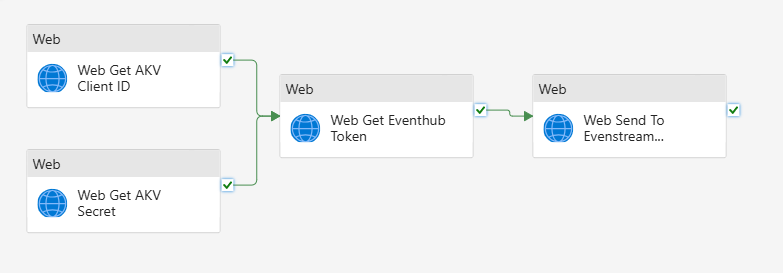
FIRST WEB ACTIVITY
-
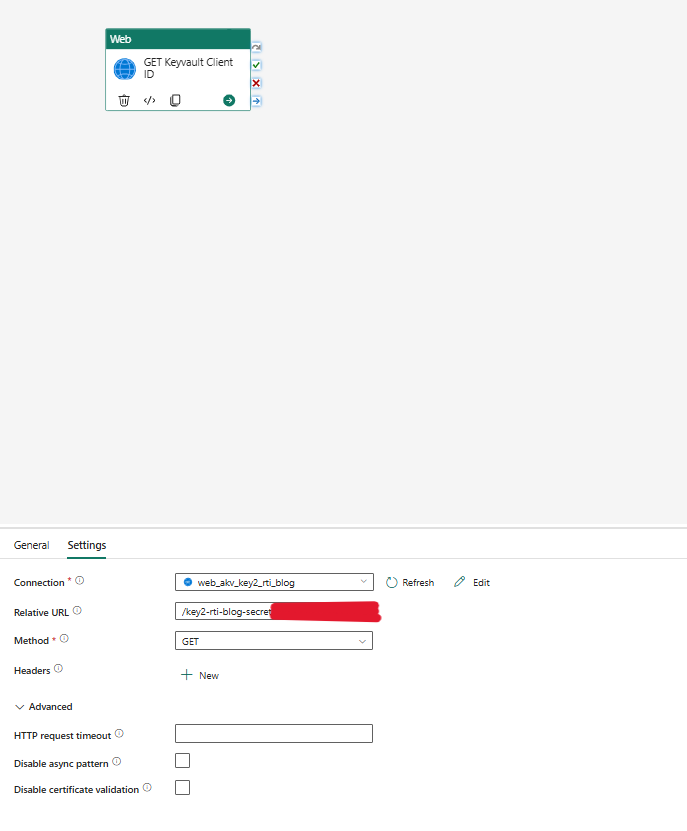
- General tab – GET Key Vault Client ID as the name for this demonstration. Use secure output. We don’t want users to be able to see the values being retrieved from Key Vault.
- Settings tab
- Connection – select your previously created Key Vault connection
- Relative URL – If you recall, you were asked to take note of your client ID within Key Vault. Use this here but only use the relative URL that is past the /secrets/ string of the URL, and then add “?api-version=7.0” to the end of the string. It should look something like this “/key2-rti-blog-client-id/<your own ID within the identifier>?api-version=7.0”
- Method – GET
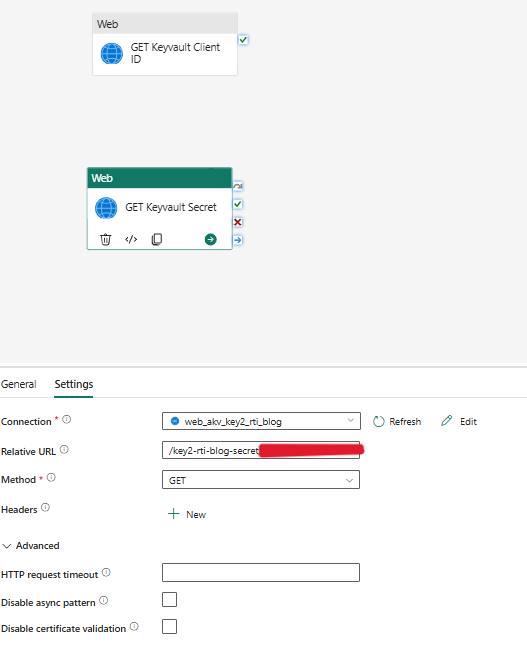
SECOND WEB ACTIVITY – Set this up the same way you did the first web activity but instead tailor it towards retrieving the secret that you stored in Key Vault. Use the same connection as well but the Relative URL will be different as shown below.
-
- Relative URL – It should look something like this “/key2-rti-blog-secret/<your own ID within the identifier>?api-version=7.0”
THIRD WEB ACTIVITY
-
- General Tab
- GET EventHub token as the name for this demonstration
- Secure output and input – we do not want users to be able to see the values being retrieved from Key Vault.
- General Tab
-
- Settings tab
- Connection – select your previously created connection used to get tokens.
- Relative URL – this will be Empty this time.
- Method – POST
- Body – you will want to concatenate the client ID and Secret from the previous two web activities into the EventHub’s source URL as shown in the screenshot below.
- Headers:
- Name = Content-Type
- Value = application/x-www-form-urlencoded
- Settings tab
Before we move on to our final web activity, let’s add parameters, as we will need these for the body of our API call. Your parameters will depend on your parent pipeline. As you can see on my parent pipeline, the parameters populate automatically after I add them to the child pipeline. Values in this demonstration are hard-coded, which is not best practice. You should populate parameters dynamically where you can.
(Note: There are two types of invoke pipeline activities that you can use, Preview and Legacy. I have found that the legacy pipeline is a little easier to use and significantly faster for our project, but you can choose whichever suits your needs.)
FOURTH WEB ACTIVITY
-
- General Tab
- Web Send To Eventstream Endpoint as the name for this demonstration
- Secure output and input – we do not want users to be able to see the values being retrieved from Key Vault.
- Settings tab
- Connection – select your previously created Eventstream connection.
- Relative URL – If you recall, you were asked to note the EventHub name within the Entra ID Authentication protocol from your custom endpoint, use this here with “/messages” at the end.
- Method- POST
- Body – you will want to concatenate the pipeline parameters whose values are being passed down from the parent pipeline, as shown in the screenshot below.
- Headers
- Name: Authorization & Content-Type
- Value = @concat(‘Bearer ‘, activity(‘Web Get Eventhub Token’).output.access_token)
- Application = /atom+xml;type=entry;charset=utf-8
- General Tab
Now that each step is complete, it is time to see data flow through our secure custom endpoint by starting the parent pipeline. If everything is set up correctly, you will see data flowing through the Eventstream as shown below. At this point, you can set up your destination of choice.
Conclusion:
Integrating Azure Key Vault with Fabric Pipeline API calls is a great way to securely utilize a custom endpoint with Fabric Eventstream for real-time intelligence. I hope this step-by-step guide proves to be helpful and thank you very much for taking the time to read my blog.